Posted on Tuesday, 7th May 2013 by Michael
My first introduction to the Raspberry PI
Many of you know me for my addiction to microcontrollers and creating some pretty cool projects. In the past I have focused solely on the Arduino microcontroller but recently with all the hype I been reading I had to get my hands on the Raspberry PI.
I got to say when they first came out I wanted to get one ASAP, but the waiting list was months long and by the time I got the email that mine were ready to ship the projects I had in mind were already done. I wanted to be the first to create an open source version of the famous pwn plugs as well as design an ata / pbx for it. Since I missed being first on those I gave up on it for a bit. Though recently I have found new need for them again and took the dive ordering 3 of them.
This article is the first of 3 that will detail the projects I complete with the Pi.
The first project was more to fill a need. Years ago I have a media player in the bedroom but over time it died and I could not justify spending tons on a new one. Then I stumbled on a XMBC for the Raspberry Pi. After reading over it for a bit it was clear that this would be a perfect low cost solution to adding a media server to my home again.
At the current time of writing this there are 3 main XMBC ports for the Rasberry Pi, RaspXMBC, OpenElec and Xbian. I am not going to go into much detail about the operating system and process of making the image. I cover that in my Raspberry PI intro class and there is plenty of info online on how to do it. The website says for newer people to go with the RaspXBMC, but on the day I was working on this project their site was down so I went with OpenElec. The process to download and create the SD card was simple and quick. In a matter of minutes I had it done and was ready for the first boot.
The boot process felt like it was taking forever but in all theory it probably took less than a minute, once loaded it was time to configure the settings. To do this you will need to navigate through the system settings setting up your network settings, time zone, weather, where to pull images from, network shares where your media is stored and so on. This was probably the most time consuming part of the project. Once this was done I decided to watch my first movie through it to test streaming wireless HD on the device.
The video ran near perfect with very little noticeable lag or jitter. There were probably less than 3 instances that were barely noticeable during the whole movie. The only issue was I was tethered to a mouse while in bed. This had to be corrected before I could see this being a perfect replacement for a commercial bought media player.
To resolve the mouse issue I made use of the onboard GPIO pins. This is where the Raspberry Pi really shines in my book. Not only is this a great mini CPU running Linux, it also gives me the ability to interact with the physical world through sensors like the Arduino does. I decided to build an infrared receiver circuit and use the onboard GPIO to tie it into the Raspberry Pi. This has been done a 100 different ways online and each person has their own spin on it. So I will tell you the simplest way to do this saving yourself hours of wondering and reading. Note that I am not saying my way is the absolute or fully correct way but after several days of testing it works and does what I need.
You will need the following parts:
- A decent IR Sensor. Avoid a Chinese knock off here as it could cause inconsistent reading. (Side note, nothing against the Chinese parts. Most of the electronics are made there and 9 out of 10 times I order from there, it is just with this project I found the 3.00 one at radio shack to work better than the 5 for a dollar eBay special.)
- A decent remote control. This can be any old remote you no longer are using.
- 3 x male to female jumper cables.
- Mini bread board
- And some time.
Some people say to use a resistor (100 ohm) and a capacitor (4.7 uf), though on several sites that I trust they do not say to use either. On my first design I used both on designs after I used none and both worked well. The fear is that there could be power variance that may damage the circuit or interfere with the circuit
So now that you have the parts lets create the circuit and connect it to the Raspberry Pi.
- Place the IR Sensor on the mini bread board. Have the curve part facing you.
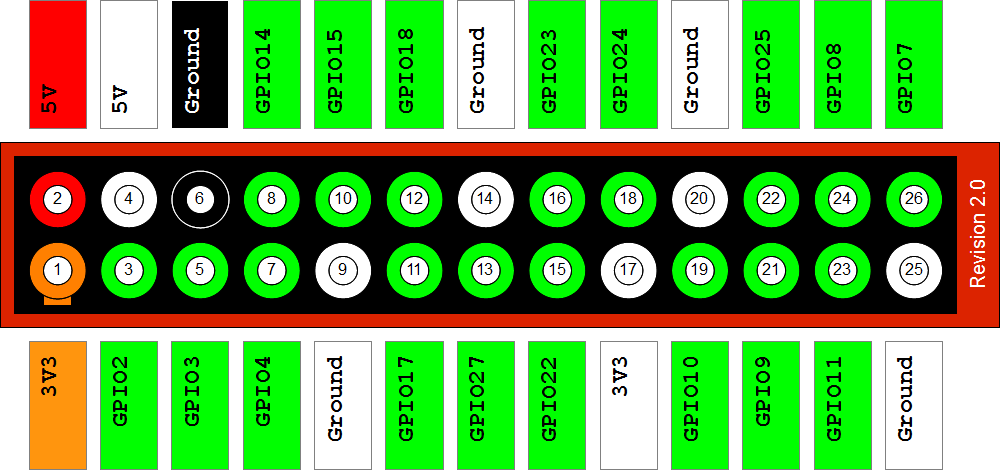
- The pin on the left is the control pin and that will be connected to GPIO18 on the graph below.
- The pin in the middle is your ground pin and that is connected to the first ground on the graph below.
- The final pin is your power pin. That is connected to the 3v pin on the graph below.
Pretty simple right!
Now that we built the circuit and connected it to the Pi it is time to configure the pi to use IR. Thankfully there is LIRC (Linux Infrared Remote Control) to make this part simple. Most of the newer Pi images have this already if not you will need to download and install it.
To download and install simply run apt-get install lirc
Once this is installed or if it is already installed it needs to be loaded into the kernel. The simplest ways to do this is to SSH to the Raspberry Pi or open a command line on the pi itself and enter the following commands.
- modprobe lirc_rpi gpio_in_pin=18 (since we are using pin 18 in the diagram above). If this comes back with no errors we are good to continue. If you have errors look them over and correct them.
- dmesg : this will show that lirc is loaded if it worked if not it will not show it.
- killall lircd
- mode2 –d /dev/lirc0 : this will allow you to test your circuit to see if the IR is wired right. Once entered nothing will show just aim you’re remote and start pressing it. It will show pulses and spaces. If this worked then we are ready to continue. Press ctrl c to exit.
- cd /storage/.config : move to a writeable space on the xmbc operating system.
- irrecord –d /dev/lirc0 lircd.conf : this will turn the signals from your remote to a understandable and usable format. This will save to the lircd.conf file. Follow the directions on the screen to the T. Failure to do so will result in it not working. If you do not have about 20 to 30 minutes come back to this later. Once you save your configuration you will need to either delete it and restart to make changes or find your remote on this site http://lirc.sourceforge.net/remotes/ and then manually update your config file with the data you find there.
- irw : Once done this will allow you to test your mappings.
At this point you are now done. There is only one further step. You can either enable the IR at each boot using an autostart.sh file in the /storage/.config or you can enable it in xmbc under settings. The choice is up to you but needs to be done or on a reboot the module won’t be loaded. you are now ready to sue your remote with xmbc and Raspberry Pi.
My completed XMBC running on Raspberry Pi and Openelec
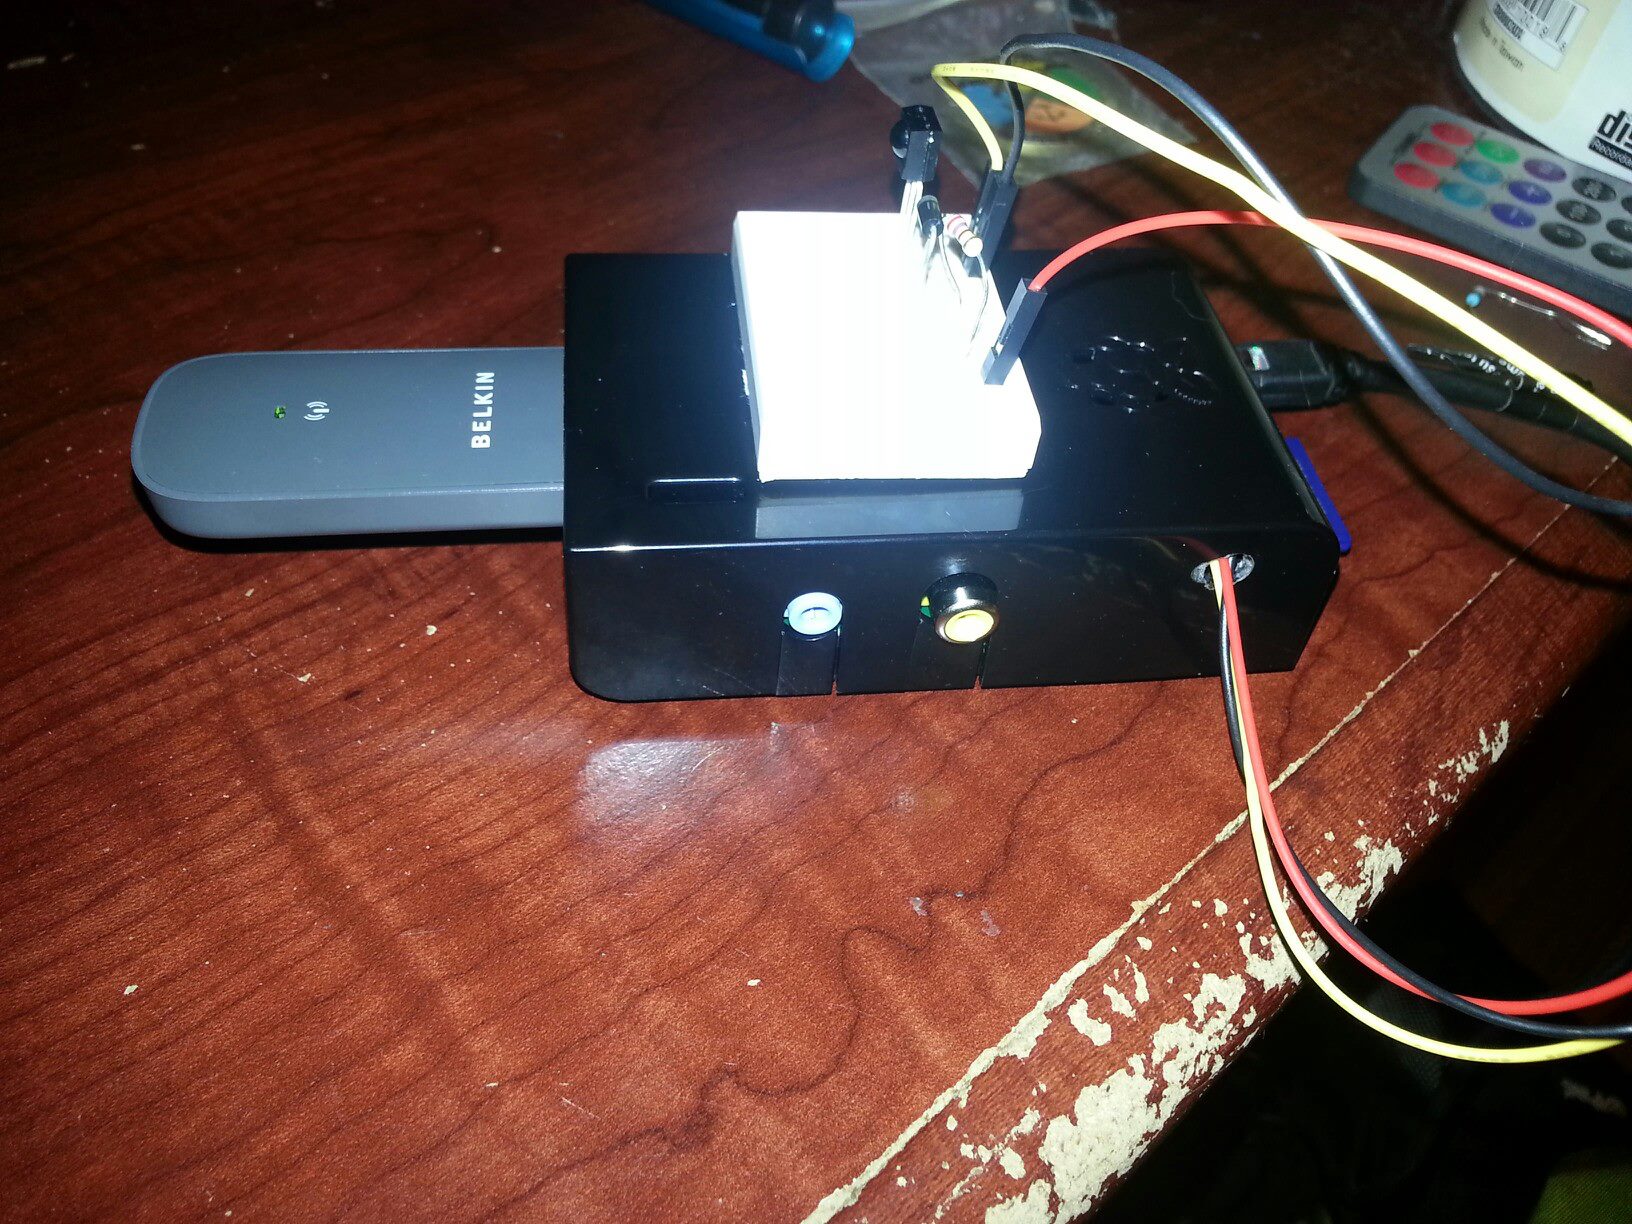
As you can see I drilled a whole in the case to run the wires inside. Eventually I will be soldering all components to a pcb and making the setup permanent.
Posted in Papers | Comments (0)