This guide came about from my Christmas tree project where I wanted to control my Christmas tree with my arduino, to shut off and turn on the lights. To do this I decided to create a webserver that would accept requests. These requests would be parsed and based on the input it would control a relay to turn it on or off.This task was simple and we will cover how to do this shortly. Though I could do this from my computer I wanted to be able to do it from anywhere. So I decided to tackle another goal for this year and write my first Android application. This is a simple application that will send the http requests with a click of a button to turn on or off the lights.
Lets look at what is required for hardware to build this.
- Arduino Uno
- Arduino Ethernet Shield
- High voltage relay (I used a Power Switch Tail II)
- Wireless Bridge (I used a Pocket rocket, china knock off)
To wire this up is simple! Place the Ethernet shield into the arduino uno. Wire pin one of the power switch tail to pin 5 on the arduino and pin 2 on the power switch tail to the ground. Next plug the Ethernet wire into the wireless bridge and verify connectivity. Then power it up and get ready to start coding.
I am going to assume that if you are reading this you have at least a clue about the arduino and how to write and push code to it. If not please go to
www.arduino.cc and read up, it is really easy. The code we are going to use for the arduino is built on sample code from "Zoomkat" found on the arduino forums.
Arduino Code:
//Define what libraries to load:
#include "SPI.h"
#include <Ethernet.h>
//Configure the Ethernet Shield:
byte mac[] = { 0xDE, 0xAD, 0xBE, 0xEF, 0xFE, 0xED }; //physical mac address
byte ip[] = { 10, 10, 9, 150 }; // ip in lan
byte gateway[] = { 10, 10, 9, 1 }; // internet access via router
byte subnet[] = { 255, 255, 255, 0 }; //subnet mask
EthernetServer server(80); //server port
String readString; //create readString class
//Start the Ethernet device, define the relay pin and setup serial for debugging:
void setup(){//start Ethernet
Ethernet.begin(mac, ip, gateway, gateway, subnet);
server.begin();pinMode(5, OUTPUT); //pin selected to control
//enable serial data print
Serial.begin(9600);
Serial.println("Started");
}
//Create the web server listener and await for client connections:
void loop(){
// Create a client connection
EthernetClient client = server.available();
if (client) {
Serial.println("Client connected");
while (client.connected()) {
if (client.available()) {
char c = client.read();
//read char by char HTTP request
if (readString.length() < 100) {
//store characters to string
readString += c;
}
//if HTTP request has ended
if (c == '\n') {
Serial.println("HTTP request ended");
Serial.print("readString = ");
Serial.println(readString); //print to serial monitor for debugging
//Data to send to the client when connected:
//now output HTML data header
client.println("HTTP/1.1 200 OK"); //send new page
client.println("Content-Type: text/html");
client.println();
client.println("");
client.println("");
client.println(" ");
client.println("");
client.println("");
client.println("OK");
client.println("");
client.println("");//Closes client sessions cleanly:
delay(1);
//stopping client
client.stop();
Serial.println("Stopped client");//Parse user http requests and see if they match what we are looking for:
//If user input is W then turn on the relay (Turn tree on):
if(readString.indexOf("w") >0)//checks for w
{
Serial.println("w found");
digitalWrite(5, HIGH);
Serial.println("LED on");
}
//If user input is B then turn relay off (Turn tree off):
if(readString.indexOf("b") >0)//checks for b
{
Serial.println("b found");
digitalWrite(5, LOW);
Serial.println("LED OFF");
}//Clear variable for next read:
//clearing string for next read
readString="";
Serial.println("Cleared readString");} // end if HTTP request is ended
} // end if client available
} // end if client connected
} // end if client
} // end loop
Now that we have gone over the code copy and paste it into your Arduino sketch and push it to your Arduino. Once it is pushed you should now be able to communicate with the arduino from your computer' s web browser by going to
http://ip_you_defined/?w or
http://ip_you_defined/?b . If you send the W that will turn your tree on and if you send a B that will turn the tree off or any device that you have plugged into your relay.
Simple right? Yes but, but typing that URL all the time gets annoying and it not as cool as having a app that does it. This is where we will look at the MIT Android App builder. This software is web based and is still in beta steps but it is extremely functional and simple to use. Not I am not a android programmer but after a few minutes I was able to create the application.
To start go to:
http://beta.appinventor.mit.edu : You will need a Google account to access it and a browser with Java enabled. Once you launch the app you will have a toolbox on your left with objects such as buttons, web browsers, text boxes and so on that can be easily dragged into your application. On the right side of the application is the properties of the objects that you dragged into your project. This area allows you to set the text, font, size, values and so on. The MIT App builder is very similar to Visual Basic interface.
To build the app lets drag two web browser objects in and two command buttons in. Edit the properties of the buttons so that one says on and the other says off. Next click on block editor on the top. it will prompt you to download a Java applet. When prompted to define the command directory just choose cancel and it will then load.
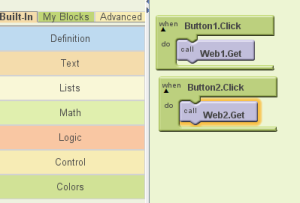
As you can see it is fairly straight forward. Button1.Click = When Button 1 is click do something. In this case we do call web1.get. Web1.get has the value of the url for on, that was defined in the properties of that object. Button2 is the same but calls the for off.
Once you are done creating the application you can then have it downloaded to you phone and tested. If you did it all right you should now be able to open the app and control your Christmas tree. Now that you have teh basics down you should be able to modify the arduino code to do other things like serve up sensor out puts from the dht11 or distance readings. There is many things you can do with this.
March 28th, 2014 at 2:09 pm
I have a problem, when I connect it to a relay it only seems to try to change its position as if it hadn’t had the necessary intensity. However, if I connect the relay directly to the 5v constant it changes. Does it give less voltage or intensity this pin?
April 4th, 2014 at 9:48 am
You need to give more detail on what you are doing.
August 17th, 2014 at 4:45 pm
Hi Michael, I don’t know if im doing something wrong, when I copy and paste your sketch, I get a heep of errors after verifying
August 19th, 2014 at 12:36 am
Okay I get all this. Thanks for posting. I have a question. How do you get Android to show the status of a Arduino door security sensor (On or Closed).
Thanks again.
November 8th, 2015 at 3:48 pm
you would need to create a function that scrapes the page for the status and updates the app with the status. Not super simple. But google appinventor and status and you should find some example code
November 24th, 2015 at 11:23 pm
you need to give more details on app inventor blocks
December 5th, 2017 at 2:57 pm
App inventor has many great tutorials making the process simple. What additional information are you looking for?